

Before proceeding please ensure that you are meeting the minimum system & software requirements to operate a node. As long as those requirements are met it should be possible to launch a validator and other types of KIRA nodes in a home environment and use off-the-shelf single-board computers such as a Raspberry PI. There are no slashing penalties for validators going offline or becoming temporarily inaccessible. Nodes that go offline for a prolonged period of time will become inactivate and removed from the consensus automatically by the state machine.
The network is designed to halt in the case where ≥ 1/3 of consensus nodes suddenly become unresponsive, however in the case of individual nodes leaving and entering the consensus randomly there should be no interruption to the network operation. As long as the number of validators does not fall below min_validators as defined in Network Properties, the chain will continue producing new blocks.
How to become a tester?
To ensure the security of the network, we must have Sybil-resistance in place. For this reason, all our testers undergo screening to identify them as unique individuals. Our testers are not just testers; they are recognized as official KIRA Evangelists. This status qualifies them for benefits like grants, bounties, potential validator seats, governance roles, and Universal Basic Income (UBI). They also get access to the private testers chat and more.
On the mainnet, a dedicated governance body can identify non-Sybil operators without the need for Know Your Customer (KYC) protocols or any other personal identification. It's worth noting that there's no limit to the number of validators on either the testnet or the mainnet.
To learn more about the role of an Evangelist or to preview your application, please visit our whitelist page.

Regardless of your decision to participate in our tester's community, KIRA extends a warm welcome to all who wish to join our open and public network. To kick-start your journey, simply install our validator or sentry node software, available on our GitHub. As an alternative, you could also download our infrastructure management tool, KIRA Manager. We heartily invite everyone with a shared passion for decentralized systems and fundamental freedoms to delve into KIRA and discover its ability to run and secure the next generation web3 apps.
Setup
Using KIRA Manager (KM) is the quickest way to run your node, as it is a straightforward bash-shell script that can easily create a new personal network or join an existing one on your behalf. However, it is important to note that KM is only intended for internal testing and should not be used on the mainnet. For operating each aspect of the infrastructure manually on the mainnet, please refer to our public documentation page after you have become comfortable and familiar with the process. At present, KM can only be installed on Ubuntu. If you prefer to use a Mac, you will need to install VMware and virtualize the Ubuntu OS. On Windows, WSL2 is supported.
To join an existing network, you will require knowledge of the specific software version you need to run and the IP address of a trusted node operator within that network. You can find all of this information conveniently located in the "Active Testnets" section below, so there is no need to worry. Let us now examine some simple setup examples.
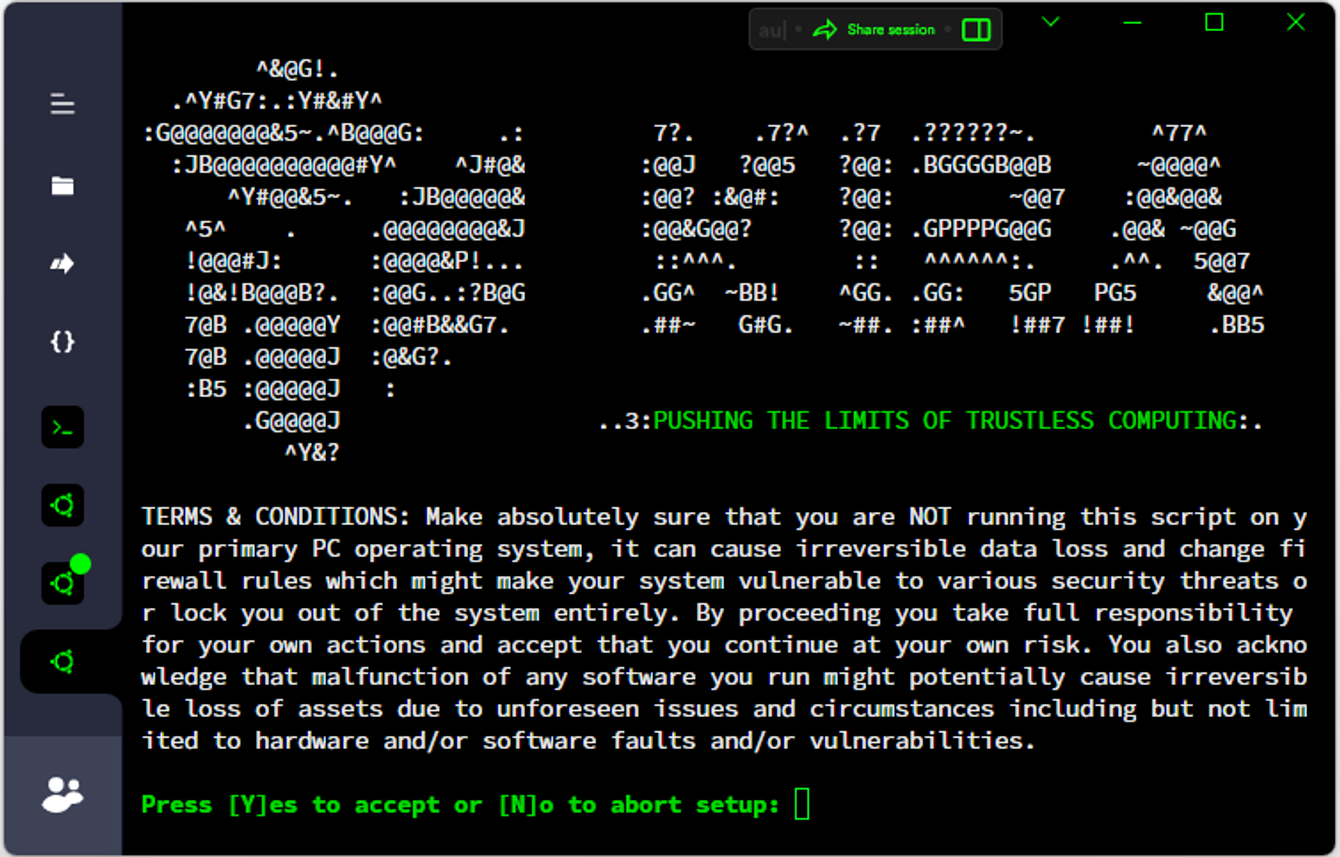
Interactive KM Setup - Terms & Conditions
Validators do not store the entire block history in order to conserve disk space. This task should only be performed by sentry and archival nodes. If you are syncing your node from an exposed validator instead of a full node, it is important to ensure that you are connecting to a legitimate network and that the party you are connecting to is trustworthy. It is also important to note that during fast sync mode, the blockchain history will not be replayed which might pose additional risks.
Simple Interactive KM Setup from GitHub Releases
Bash
Copy
# assume root permissions
sudo -s
# Example installation from github releases, please copy entire code section from below.
# You will be prompted do enter release version. Each testnet has a different KM version.
# Example release version is v0.11.14, see "Active Testnets" for the correct version to use.
cd /tmp && apt-get install -y wget && \
UBUNTU_AGENT="Mozilla/5.0 (X11; Linux x86_64) AppleWebKit/537.36 (KHTML, like Gecko) Chrome/90.0.4430.85 Safari/537.36" && \
echo -ne "\033[1;32m\nPlease enter version of KM to install: \033[0m" && read V && \
wget --user-agent="$UBUNTU_AGENT" https://github.com/KiraCore/kira/releases/download/${V}/init.sh -O ./i.sh && \
chmod +x -v ./i.sh && ./i.sh --infra-src="$V" --init-mode="interactive" || echo -e "\033[1;31mERROR: KM setup failed, error code '$?'\033[0m"
Simple Interactive KM Setup from IPFS
Bash
Copy
# assume root permissions
sudo -s
# Example installation from IPFS CID, please copy entire code section from below.
# You will be prompted do enter CID. Each testnet has a different KM CID.
# Example CID is bafybeiczsnbmbf4pvpbbxk3gnjlieno4vinrku4e5c32q7wqqjbw6t2ctu
# Please see "Active Testnets" for the correct CID to use.
cd /tmp && apt-get install -y wget && \
echo -ne "\033[1;32m\nPlease enter CID of the KM release you want to install: \033[0m" && read CID && \
wget https://ipfs.kira.network/ipfs/$CID/init.sh -O ./i.sh && chmod +x -v ./i.sh && \
./i.sh --infra-src="$CID" --init-mode="interactive" || echo -e "\033[1;31mERROR: KM setup failed, error code '$?'\033[0m"
Seed Nodes
Once you have accepted the initial terms and conditions, you will be presented with the Launcher Menu, which enables you to configure your node, manage networking settings, download snapshots, and preview the hash of a genesis file. Within the Node Launcher Menu, you will need to specify the IP address of a trusted seed node or another validator. Your node will use this connection to synchronize with other nodes on the network and keep its copy of the blockchain up to date. You can request an IP address from any of the fellow validators in the testers’ chat, or use an address of a genesis validator that is listed in the corresponding testnet section below.
Every node has a connection limit and the official genesis validator may be targeted by the DOS/DDOS, and thus become non-operational or non-responsive to the new peers. If this happens, node operators will need to coordinate via the testers’ chat and share between each other IP or DNS addresses of their personal validator, seed, or sentry nodes. Alternatively, testers can utilize any endpoint of an active INTERX node at <IP>:11000/api/pub_p2p_list where <IP> is an IP of any public testnet node to discover more IP addresses.
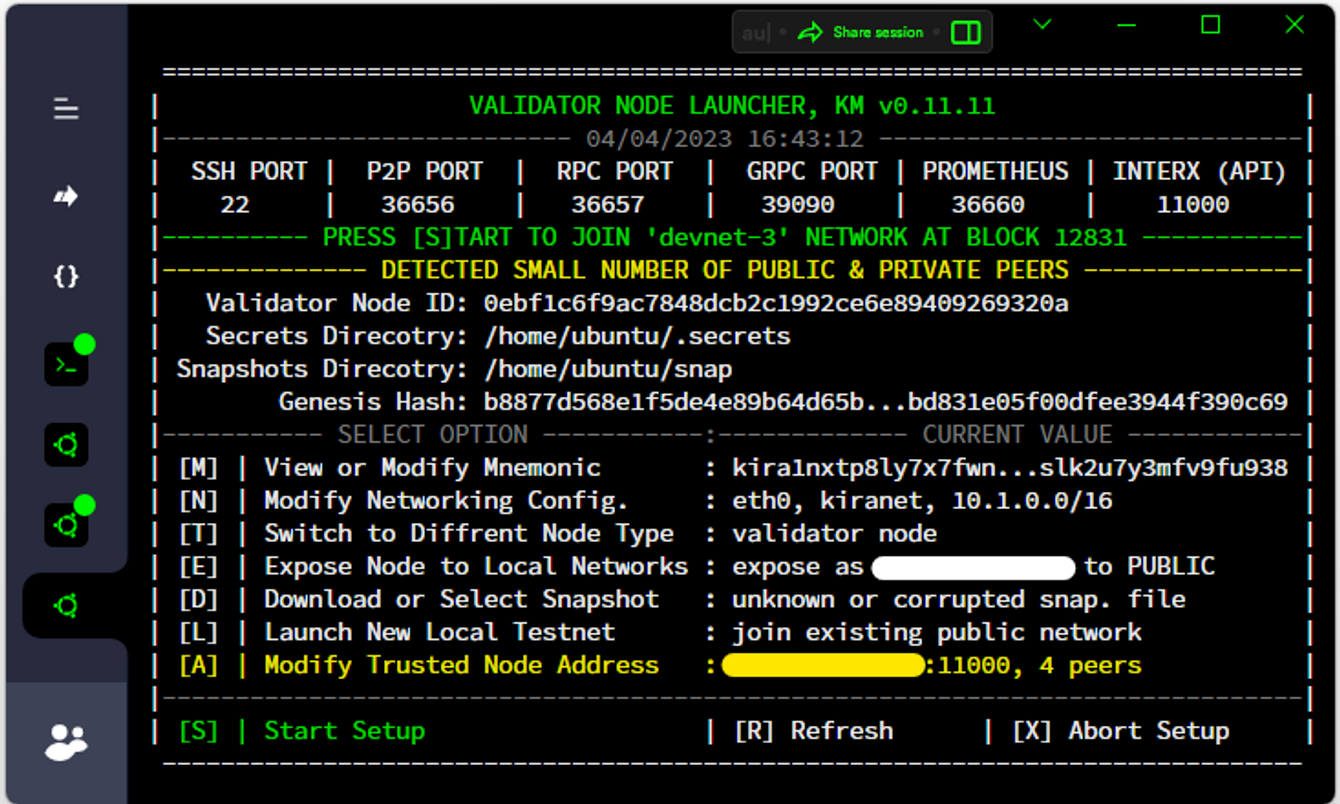
Interactive KM Setup - Launcher Menu
When connecting to a new network, it is important to pay attention to certain details to ensure that you are joining the correct chain. One of the key factors to consider is the number of peers in the network, as this can give you an idea in regards to the legitimacy of the chain (it is unlikely the attacker would be hosting hundreds of active nodes). In addition, it is crucial to verify both the Genesis Hash and network name to confirm that you are connecting to the intended chain. To find the hash of the genesis file, you can refer to the active testnet information page, which should provide all the necessary information to help you make an informed decision about joining the network.
Recovery
As a validator, your most important role is to stay online, be an active participant in the testers’ community, and preserve the cryptographic secrets that your node will use to sign new blocks being proposed to the network. There can be many of those “cryptographic secrets” that you need to know about and archive, so we simplified the entire process into just a single set of bip39 mnemonic words that you need to write down. You can visit the Key Management page to learn more or utilize KM to generate it all for you automatically. If you choose to go with KM, please make sure to select option [M] View or Modify Mnemonic before leaving the “Node Launcher Menu” and follow up with [V] Display master mnemonic from keystore within the menu of the “Secrets Manager”.
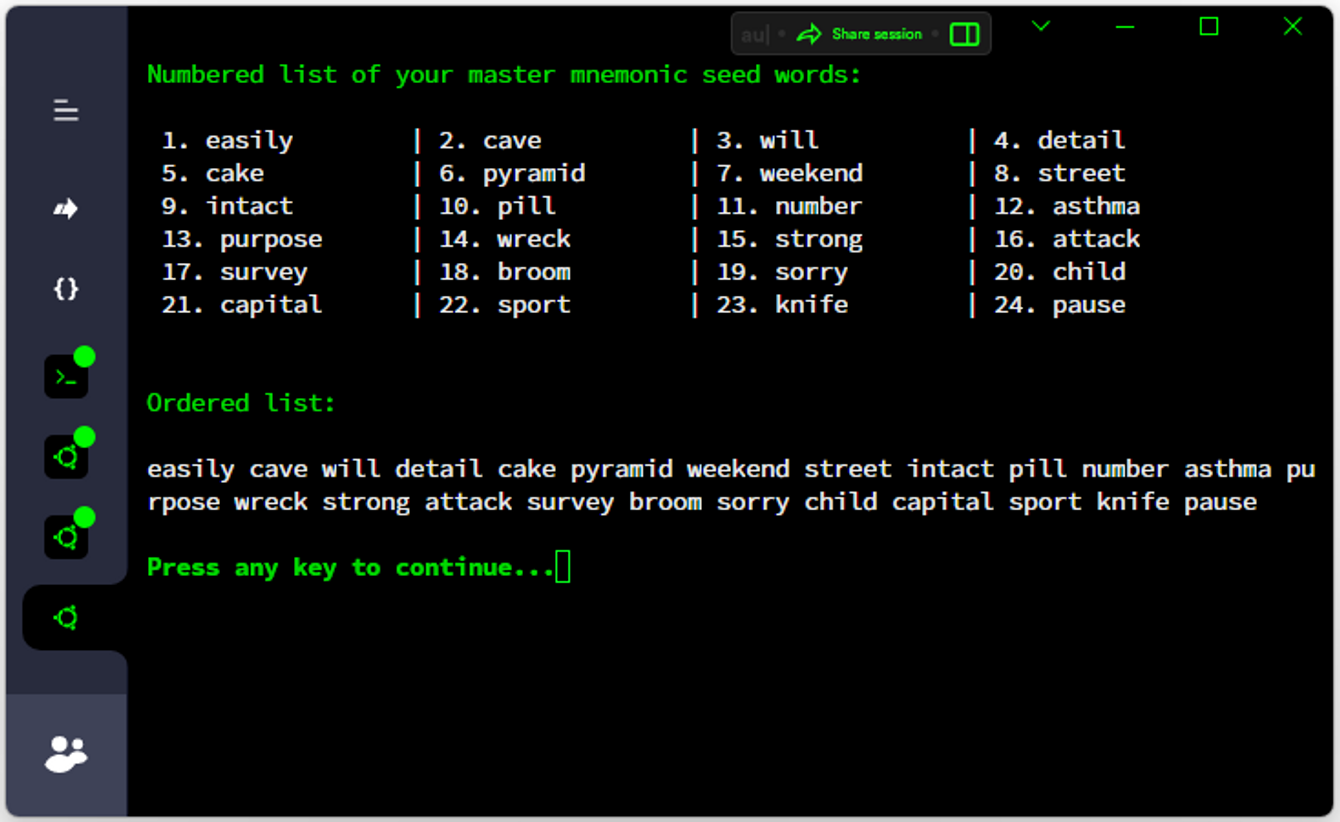
Interactive KM Setup - Example of a Mater Mnemonic Preview
If by mistake you forgot to write down your mnemonic words, you can always display them by typing the following command in your console window: tryGetVar MASTER_MNEMONIC "$KIRA_SECRETS/mnemonics.env". If your node fails or needs to be recovered, you can regenerate all the secrets by providing the master mnemonic to the KM within the “Node Launcher Menu”. Otherwise, your node will generate a new set of secrets every time you set up a new node on a fresh instance.
If you ever need to fully recover your validator node, including all its secrets and private keys, you can do so by importing the mnemonic that you previously wrote down. To access this option, simply select[M] Modify master mnemonic and DELETE all secrets from the main menu of the “Secrets Manager”. However, it is important to note that this process will destroy all auto-generated secrets and replace them with the ones derived from your master mnemonic. You should be very careful when using this option and ensure that you have a backup of your master mnemonic in a secure location. It is also crucial to never attempt to recover your validator or reuse your secrets on two machines simultaneously. Doing so will result in the double signing of a block and lead to your node being jailed.
You should never under any circumstances provide anyone with your private keys or mnemonic words. Keep them stored on a piece of paper offline and keep an online copy only on your validator node. It is also recommended to set up a recovery address that can be used to rotate your validator key in case you suspect that your node might have been compromised. You can learn more about that process from our public docs page.
Joining Validator Set
To join the validator set you will need to become an official KIRA tester first. Your initial goal will be to determine your validator public address, which you will need to submit as part of the application process to become whitelisted.
Once you have completed the installation process, you can easily find your validator address by typing kira into your terminal window to open KIRA Manager. From there, simply press the corresponding number on your keypad to designate your validator container (usually [0] by default). You will then be presented with a container manager that provides statistics about your node, including your Validator Address.
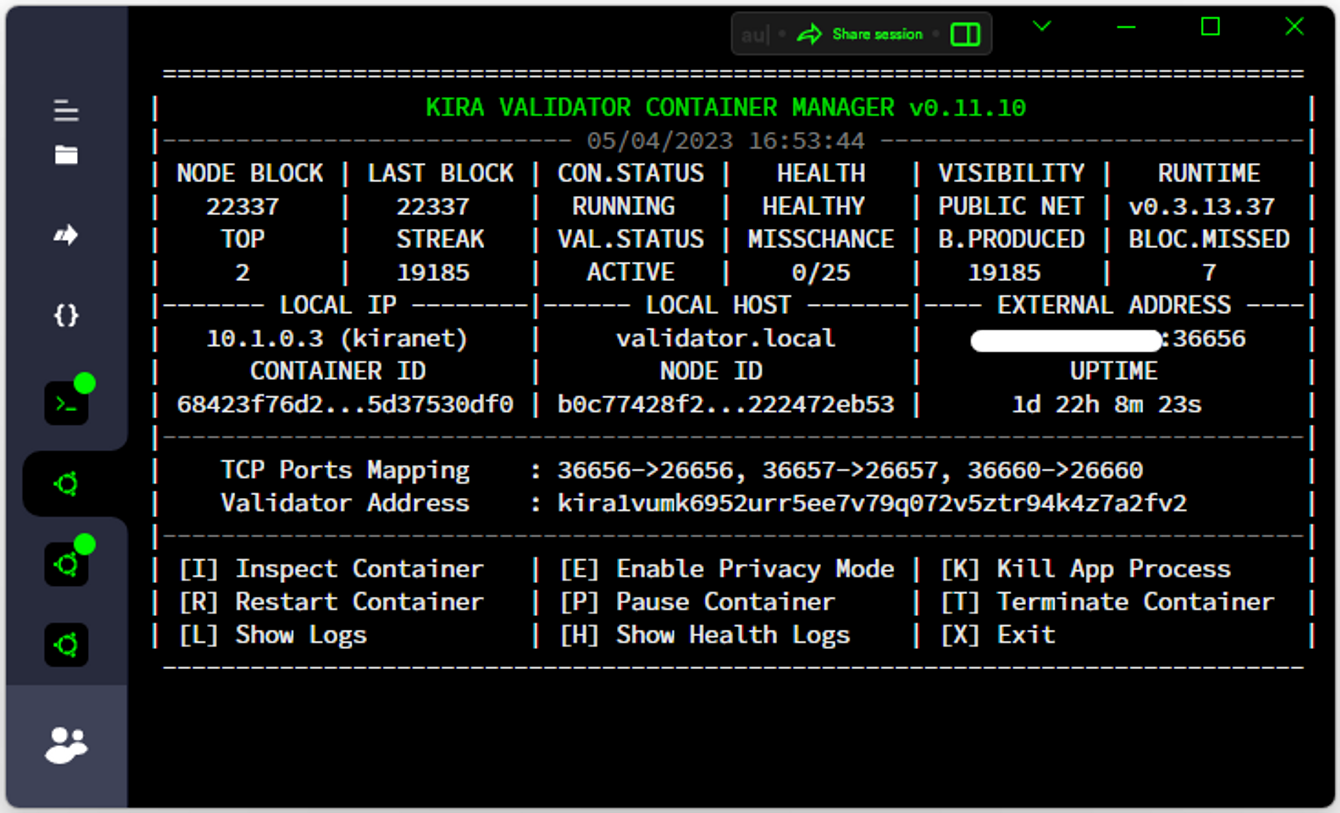
KM - Container Manager
Once you have been whitelisted by the testnet support team, you will be presented with an explicit option to [J] Join Validator Set in the main menu of KIRA Manager. Upon executing this option, your node will begin to produce and sign proposed blocks. In addition to this, the main menu of KIRA Manager provides many other options such as configuring the firewall or creating snapshots.

KM - Main Menu
NOTE: One of the most useful functions is the maintenance mode. Whenever you need to upgrade your node, move it to another instance, or perform any other operations that might result in your validator signing process stopping, you can select an option to [E] Enter Maintenance Mode. This will prevent your validator's on-chain statistics from being reset and entering an inactive state. Once you have completed your maintenance operation, you can simply disable the maintenance mode by selecting the [D] Disable Maintenance Mode option.
Upgrades
The main highlight of all KIRA testnets is collaboration on performing automated on-chain upgrades. Our upgrade module is a blockchain application that allows validators to coordinate soft & hard forks as well as agree on the integrity and content of each new KIRA release. KIRA Manager will automatically detect upcoming changes, delete all containers, perform snapshots & genesis file exports then rebuild the environment and launch a new release without your assistance. You can enable or disable automated upgrades from within your KM, by selecting option [U]. You will also be notified via the KM of the exact time of the upcoming upgrade. All upgrades are scheduled according to timestamps predefined in the upgrade proposals and NOT block-height based thus making it way more predictable to coordinate and apply changes regardless if you plan to use KM or a dedicated continuous deployment (CD) pipeline for your infrastructure.
It is mandatory for ALL validators to vote on upgrade proposals. If you skip the vote then the on-chain status after the upgrade will be changed to inactive and you will not be producing blocks while your validator leaderboard rank will significantly decrease.
Governance proposals voting example
Bash
Copy
# With KM (voting in favor)
voteYes <proposal-id>
# With KM (voting against)
voteNo <proposal-id>
# Without KM (voting in favor)
sekaid tx customgov proposal vote <proposal-id> 1 --from=$ACCOUNT --chain-id=$NETWORK_NAME \
--keyring-backend=test --fees=100ukex --yes --log_format=json --broadcast-mode=async --output=json
# Without KM (voting against)
sekaid tx customgov proposal vote <proposal-id> 0 --from=$ACCOUNT --chain-id=$NETWORK_NAME \
--keyring-backend=test --fees=100ukex --yes --log_format=json --broadcast-mode=async --output=json
If you do not wish to use KM and instead utilize your own dedicated continuous deployment (CD) tools, then you can acquire informations about upcoming upgrades from either the sekai CLI or the following two INTERX endpoints:
<IP>:11000/api/kira/upgrade/current_plan
<IP>:11000/api/kira/upgrade/next_plan
The “current” plan contains informations & resources regarding the current release while the “next” plan contains informations & resources regarding upcoming releases. You can also use resource references specified in the “current” plan endpoint of a trusted node while joining the network for the very first time. If you choose not to use KM and a new genesis file is required (hard fork), you can create it by first exporting genesis at the height where the network stopped (your node daemon should be shut down) and then passing it through a dedicated new-genesis-from-exported command.
Genesis file upgrade example
Bash
Copy
# export genesis after ensuring your node is stopped
sekaid export --home=$SEKAID_HOME > ./genesis-export.json
# upgrade release of sekai to the version defined in the on-chain upgrade plan
# execute conversion of the exported genesis file and launch your node using the newly generated genesis
sekaid new-genesis-from-exported ./genesis-export.json ./new-genesis.json --json-minimize=true
To ensure a smooth and coordinated upgrade process, all upgrades will be coordinated by the KIRA testnet support team. Any notifications regarding governance proposals or software changes will be communicated through the testers’ chat. Therefore, it is important to regularly monitor the pinned posts in the chat to stay up to date with the latest information.


